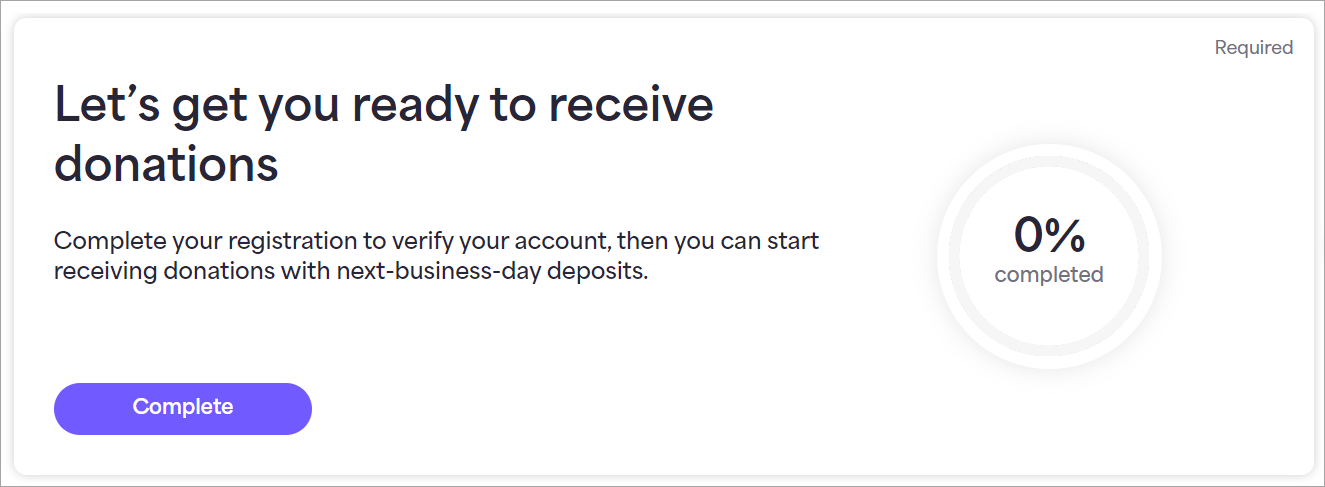
Givelify disburses donations by next business day automatic deposits. The setup menu helps you get easily set up to start receiving donations and accessing the features in the Analytics Studio. You can perform the tasks in any order you choose.
Get next-day deposits
Givelify disburses donations by automatic deposits on the next business. Follow these steps to set up your organization to receive next-day deposits.
- Visit analytics.givelify.com and sign in to your organization’s account.
- In the Let’s get you ready to receive donations panel, select Complete to get started completing your registration.
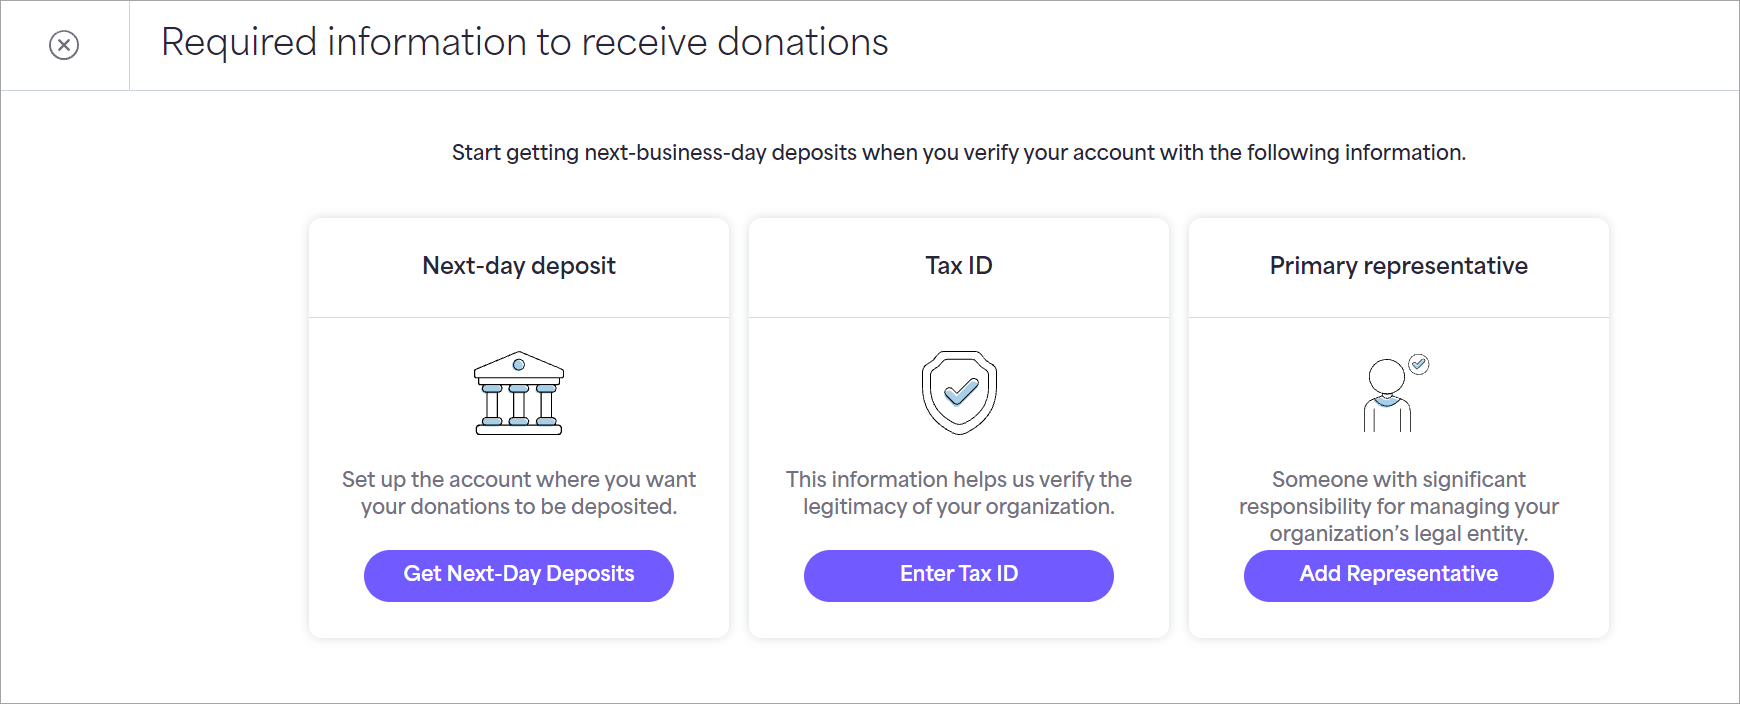
- Select Get Next-Day Deposits on the setup menu to specify the account where you want your donations to be deposited.
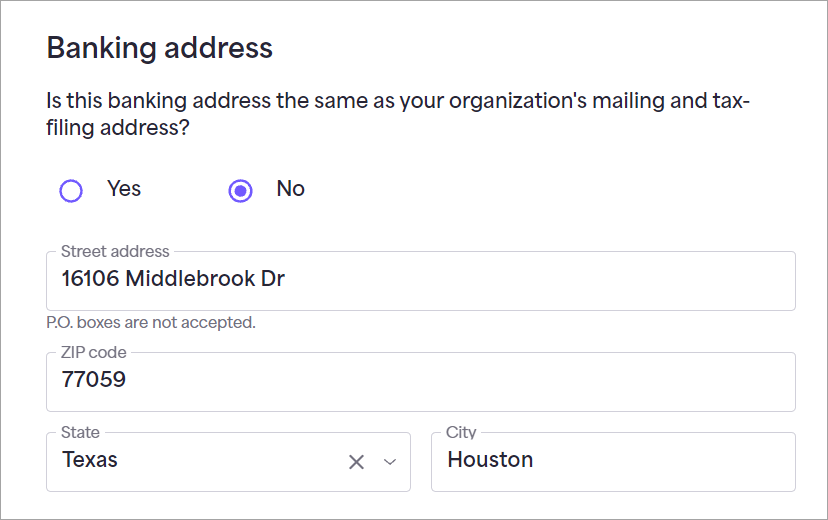
- Enter your checking account Routing Number and Account Number, specify whether your Banking address is the same as your organization’s mailing and tax-filing address (Yes or No), and then select Submit.

- If the address associated with your bank account is different than your organization’s mailing and tax-filing address, click No and enter the correct address in the fields and then select Submit.
The Next-day deposit step shows Submitted and we'll review the information by the next business day.
You will receive an email in 1-3 days informing you of the status. If approved, the setup menu step status will change to Verified.
More next-day deposit information needed
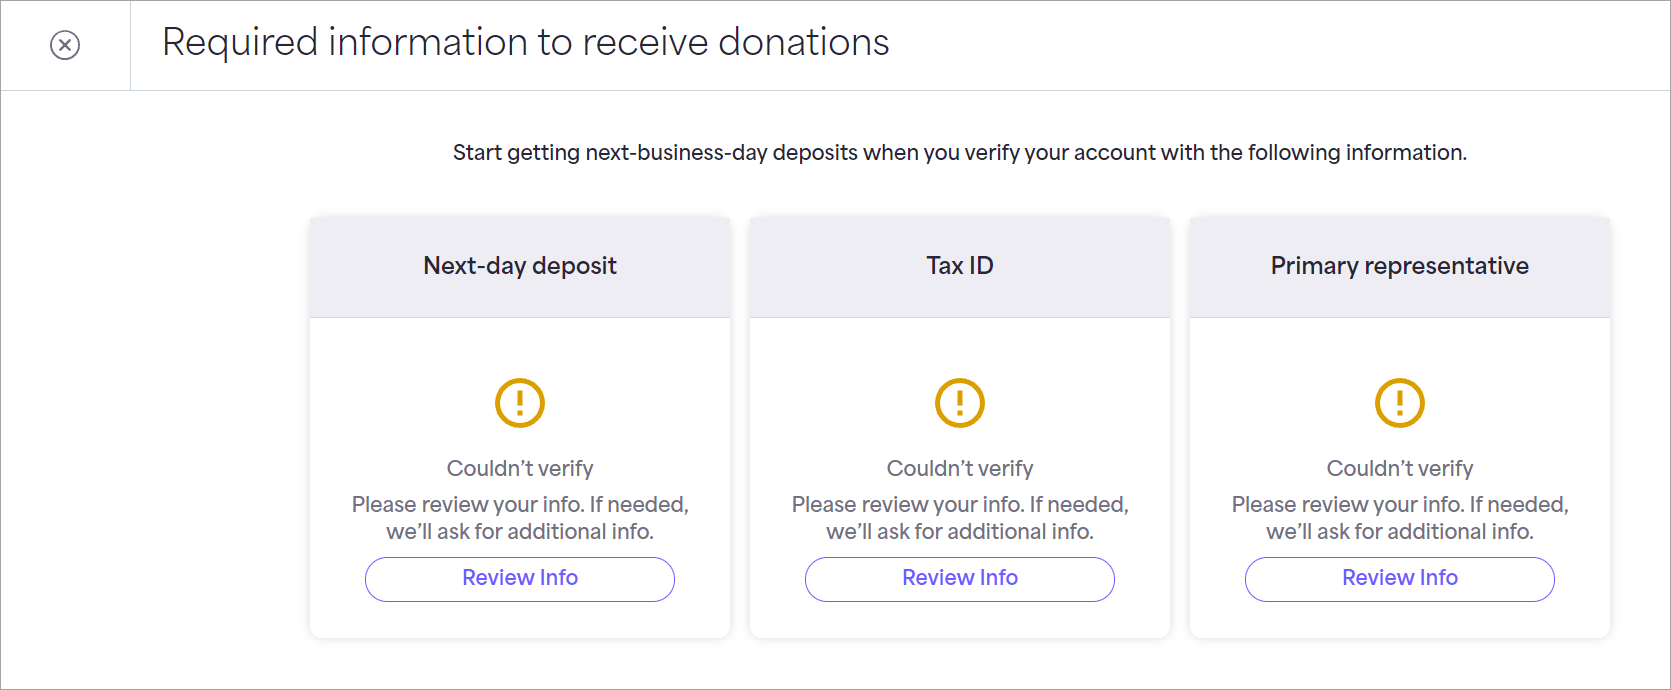
If additional information is needed to verify your next-day deposits, you will be sent an email asking you to review and upload additional information. Follow these steps to review your information and resubmit the appropriate documents:
- On the Next-day deposit step, select Review Info.
- On the Review account info screen, review the information to make sure everything is correct.
If your bank account could not be verified, you must upload a voided check from your organization or an official verification letter from your bank. The organization’s legal name and address must be printed on the check or letter.
Follow these steps to upload the required documentation:
a. In the Account verification documents area, select Upload document and navigate to the file and select it.
b. Once the document is uploaded, select Submit.
Enter Tax ID information
Givelify uses your tax information to help verify the legitimacy of your organization. Follow these steps to provide your Tax ID or Employer Identification Number:
- Select Enter Tax ID on the setup menu.
- On the Tax ID screen, provide your tax information so we can verify that your organization is legitimate, established, and that donations are going to the right place.

Enter the following information:- EIN/Federal Tax ID - Enter your organization’s Employer Identification Number or Federal Tax ID. If you do not have an EIN, select the Don’t have an EIN link to learn how to obtain one. Our system requires an EIN to disburse donations.
- Year – Enter the year your organization was established.
- Religious affiliation – If you are a place of worship, choose your religious affiliation from the drop-down list. If your religious affiliation or denomination is not listed, contact Givelify Support. (This field is not displayed if you are registering a nonprofit organization.)
- Congregation/organization size – Select the range that represents the size of your congregation or organization.
- Select Submit.
The Tax ID step shows Submitted and we'll review the information by the next business day.
You will receive an email in 1-3 days informing you of the status. If approved, the step status will change to Verified.
More Tax ID information needed
If additional information is needed to verify your tax identification or employer identification number, you will receive an email asking you to review and upload additional information. Follow these steps to review your information and resubmit the appropriate documents:
- On the Tax ID step, select Review Info.
If your tax information could not be verified, you must upload a letter from the IRS that includes your organization’s EIN number. Both the EIN and the organization’s legal name must be clearly visible. - In the EIN confirmation area, select Upload document and navigate to the file and select it.
- Once the document is uploaded, select Submit.
Add primary representative
Federal law requires all financial institutions to obtain, verify, and record personal information that identifies a primary representative for the organization. The primary representative is someone with significant responsibility for managing your organization’s legal entity, such as Chief Executive Officer, Chief Financial Officer, General Partner, Senior Pastor, or any other individual who regularly performs similar functions.
Follow these steps to identify your organization’s primary representative:
- Select Add Representative on the setup menu.
- On the Primary Representative screen, check the check box if you are the organization’s primary representative, or enter the primary representative’s First Name and Last Name, Title, Date of Birth, and Social Security Number and then select Next.

- Enter the Primary representative’s Street address (P.O. boxes are not accepted), Zip Code, State, City, and Phone number.

- Read the Terms of Use and select Submit.
The Primary Representative step shows Submitted and we'll review the information by the next business day.
You will receive an email in 1-3 days informing you of the status. If approved, the setup menu status will change to Verified.
More primary representative information needed
If additional information is needed to verify your primary representative, you will receive an email asking you to review and upload additional information. Follow these steps to review your information and resubmit the appropriate documents:
- On the Primary Representative step, select Review Info.
If your primary representative information could not be verified, you must upload a government-issued ID, such as a driver’s license or passport. - In the Upload a government-issued ID area, select Upload document and navigate to the file and select it.
- Once the document is uploaded, select Submit.
The entire registration and bank verification process can take between 7-10 business days. While your bank account is being processed, we are working with our bank partners to set up your account for automatic next business day deposits.
Donations received during the set-up period will be manually disbursed into the account you provided within 3-5 business days. Donations received after your account is set up will be automatically disbursed the next business day.
What's Next
- Customize your profile
- Invite users to join your organization's account
- Add customized giving envelopes to your organization's account
- Set up campuses for your organization
Feel free to contact our Customer Support team at support@givelify.com if you have any further questions.